Saturday, 27 October 2012

Butterscotch cookies & Raspberry Cupcakes!

I'm over in Germany having some fun girl-time with my Niece and Sister and you guessed it!  Yup, we've done some baking.  We used the excuse to invite a friend and her twins over for a little Afternoon Tea and chose to make Butterscotch Cookies and Raspberry Cupcakes.  Now my Sis likes playing in the kitchen as much as me, but I bet her cupcakes will be better decorated than mine :-)

The Butterscotch Cookie recipe came out of her Good Food Magazine and is super simple.  Its a basic cookie recipe, but with a sneaky addition of some puffed rice breakfast cereal to give them a crunch.  We managed to get hold of some Choco Krispies, so they added a bit more chocolate to the mix - no harm in that!


We also added the chocolate chips into the batter, rather than popping on the top for decoration.  The recipe says it makes 10 cookies (we doubled-up), but you definitely get more than that.  We got 23 from a double batch and they could have been smaller.


We popped them in a Gas Mark 3 oven for 18 minutes or so.  Half-way through they were taken out and banged on the worktop (use a tea-towel in between to save the work-top).  This helps get out some of the air-bubbles and flattens out the cookies. 

Bake until golden brown.  They may still feel soft on top, but they will firm up when cooled.


Sweet, but not overly so, with a nice crunch from the Krispies.

Our little kitchen assistant managed to get hold of my Dr Oetker Cupcake Recipe book and chose the Raspberry Cupcake page to look at.  She was most insistent that this was the page - so the decision was made - Raspberry Cupcakes it was!


Now the fun thing for this recipe, was that the book is all in German.  Thankfully Google Translate came to the rescue and we figured it all out.  But you did have to use a little lateral thinking.  Cupcake rust = bake until golden brown!

A nice simple recipe again, that used frozen raspberries tossed in cornflour (to help prevent them leak juice everywhere and sink to the bottom of the batter) and yogurt in the batter.
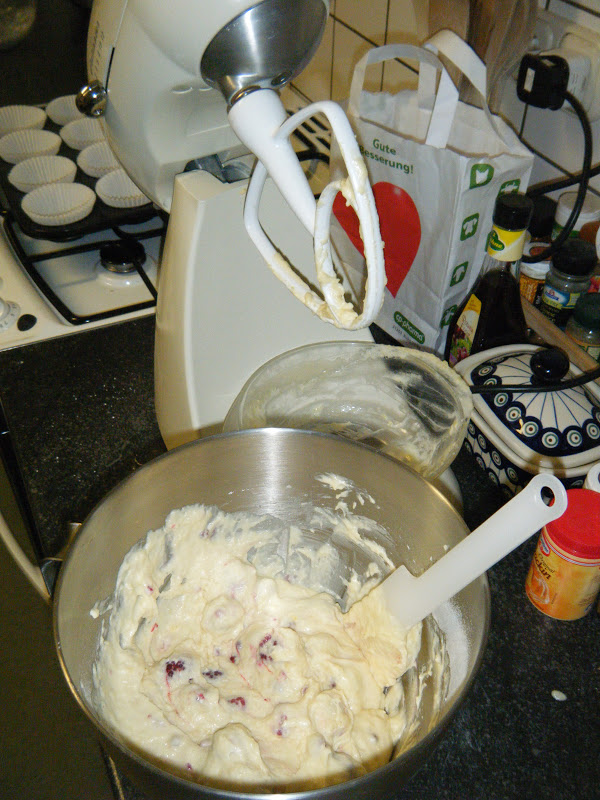


All mixed together, the batter was divided between the 12 cupcake cases......


and then baked for around 25 minutes until just golden on top and a skewer came out clean.  Amazingly the raspberries defrosted in the oven and it all baked through perfectly.

The topping consisted of whipping cream, Sahnesteif  (a German cream stiffening agent) and raspberry syrup, which was all whipped up until nice and stiff.


Then we had fun with the piping bag!  My Sis was much more precise!


Whereas I couldn't stop giggling!


The recipe had way too much cream for the amount of cupcakes - you could easily get away with half.  Despite one cupcake missing - well we had to test one to make sure it was alright before icing....................


A fun afternoon baking with my Sis and then a equally nice afternoon consuming the goodies with friends.


So what are you baking?

Tuesday, 23 October 2012

Paul Hollywood's Milk Loaf

Just a quickie post to say I tried another bread recipe from Paul Hollywood's 'How to Bake' book the other day.  Its full of yummy bread and sweet delight recipes, but the one I tried this time was a 'Milk Loaf'.

He seems to favour quite a sticky dough for most of his bread recipes, as you seem to use a bit more water than usual.  Also rather than the warm water normally suggested in bread recipes, he opts for cool water.  This takes longer for the initial rise to take place, but in the process provides a fuller flavoured dough.  If, however, you are baking in a cold wintery kitchen, use slightly tepid water.

Butter is melted in warm milk, then mixed in to your flour, yeast, sugar and salt until its a nice sticky dough.  Then tip it out onto an oiled surface and knead for 5 - 10 minutes.


I then popped out for a bit and 3 hours later it was a lovely billowy pillow.......


You then knock it back, shape into a rectangle and pop in a loaf tin...........................


........ so it can then rise for another hour or so until doubled in size.


Then popped in the oven until lovely and coloured.


Buttery rich, with a sweet soft texture it cuts nicely and is lovely with butter and jam when still warm.  It also toasts well, though does become a bit crumbly after a few days.

I've never made a white loaf in a tin before, as I usually prefer a round loaf, but I'm really pleased with how it came out.  Altogether, rather scrummy!


Happy baking!

Saturday, 13 October 2012

Treats for the troops #2

Due to popular demand, more batches of biscuits (plus some sweeties!) found themselves flying off to Afghanistan for my BIL to share (hopefully!).  The last lot took only 6 days to arrive and about 6 minutes to be consumed!

These are the final product, plus Colin, who is certainly not camera-shy.  The temptation to post him off as well was quite high!


My first offering were Hazelnut dunking biscuits, from a recipe I found online whilst searching for hazelnut biscuits.  I halved the recipe as it was for 50 biscuits and I was using up store-cupboard ends.  I also used 1 medium egg as its a bit difficult to halve an egg!
Rather than the whole hazelnuts I used 70g chopped roasted hazelnuts + 30g ground hazelnuts to make up the right amount.

All the ingredients, except the hazelnuts, were blended in the Kenwood and I then folded in the hazelnut mix.


Using a teaspoon as guide I made about 24 little balls which were rolled and then flattened slightly with the palm of my hand and placed on a lined baking sheet.


The recipe didn't stipulate whether to use a fan or static oven so I placed the tray in a 180c fan oven and baked in two batches to get a more even bake.  First batch for 9-10 minutes( I opened the oven to check them, so lost some heat).  Second batch for 8 minutes 


They are cooked to a light golden colour and as you can see are really quite delicious!

My second offering were a batch of Jo's Peanut butter & choc chip cookies, which I had made and blogged about before and added an update here.

They are a really quick and simple cookie to make and extremely tasty.


This time I baked them in a 180 fan oven.  First batch for 8 minutes + 2 minutes.  Large teaspoon size.  Second batch for 9 minutes

All packed up and ready to go..................  Lets hope these make it there as fast! 


Here's a random photo from the garden that made me chuckle this week........................


Its National Baking Week next week, Happy Baking!


Tuesday, 25 September 2012

Gluten-free Lemon Polenta Cake

 
I've been meaning to try a Lemon Polenta Cake Recipe for a while, which I found on the back of a packet of Imbhams Farm Polenta Flour.  I finally got around to it this weekend, as a good excuse to use up a lemon excess.
 
Recipe as follows:-
 
115g Fine Polenta
175g Unsalted Butter - softened
225g Demerara Sugar
200g Ground Almonds
3 Large Free Range Eggs 
Zest of 3 Lemons and the juice of 1.5 Lemons
1 tsp Gluten Free Baking Powder
 
Unless you are gluten intolerant then its absolutely fine to use normal baking powder as a substitute.  I also chose to use the juice of 2 lemons, as the more lemony the better!
 
You need to preheat the oven to 160c and line a 20cm baking tin with parchment or a tin liner.
 
All ingredients can be put into a food processor and whizzed to a smooth batter, but mine doesn't have enough capacity.  Instead I whizzed the butter, polenta and sugar together in the processor and then moved the whole lot down into the Kenwood mixing bowl and added first the eggs (1 at a time), followed by the almonds, baking powder and then the juice and zest.  Its quite a wet mixture, but then I did add extra lemon juice.
 
It was then popped into the lined tin and into the oven. 


Now, I normally bake cakes in a static oven and the recipe did not stipulate whether it was fan or static.  You are recommended to bake it for 50 - 55 minutes, until a skewer comes out clean.  After 50 minutes in a static 160c oven, the centre of the cake was still really wet, so I flipped it over to fan over for another 10 - 15 minutes.  By this time the top was colouring quite a lot and still a bit moist in the centre, but then I don't think this cake should be dry.  Its then left in the tin to cool, before devouring.


Its gorgeous still warm from the oven and would be lovely with ice-cream and perhaps some extra lemon syrup to drizzle over it.  The demerara sugar also gives it a nice crunch. Whilst still tasty cold, it does become a lot more crumbly over the next day or so, so best eaten sooner rather than later - shame that!  Whilst Googling to see if anyone else had tried it, I found a lady who had added blueberries to it - sounds scrummy.

My other baking attempt this weekend was a 100% Rye flour loaf that I had seen in my new copy of Paul Hollywood's How to Bake.  An absolute bargain if you can get it at this price.  Even cheaper than my Amazon copy!

I think I need to try this again and maybe add a bit more water as it did seem very dense.  The black treacle in it gives it an unusual taste.  Though not unpleasant when toasted with marmite.  What a surprise!


I can't wait to try more recipes from this book and its the Great British Bake-Off on telly tonight too!

Happy Baking!

Saturday, 8 September 2012

The Knitting Mojo Returns!

If the truth be told, the mojo never left, just the body wasn't willing.  However, normality is slowly returning and I'm now knitting, baking, running and of course working like a trooper!  I still have to be careful, but all is good in Scubamonkey world.

I've not been idle.  Throughout the Ravellenic Games I had a good excuse to finish a WIP (work in progress) hot water bottle cover that had been hiding at the bottom of the basket for months.........


I couldn't resist the sheep ribbon for the tie.  This is being saved for a Xmas pressie. 

Ellie got a new pair of socks, which she seems to be quite partial to :-)


I had fun knitting this lovely Lotus hat, which was taken to Canada as a gift for Rosa........


All of which helped me get some Ravellenic medals which you can see on the project pages (apologies to non-Ravelry users, as the links will not work for you).

I'm also taking part in a Knit-a-long with a German Group which a dear Rav friend got me involved in and so far I've completed this pair of socks .........


The next pair has been started and in the interim I also found time to make OH a new camping hat!


Obviously that's me doing the modelling!

Phwew I've been busy!  For more Finished Object Fridays posts head over to Tami Ami's blogspot

Happy Knitting!


Sunday, 26 August 2012

Treats for the troops!

What on earth, I hear you cry!  Well, a while back I heard about a Mum (or was it an Aunt!) who baked homemade biscuits and cakes and sent them out to her son who was serving in Afghanistan.  They were such a hit that it sort of took off and requests were coming in by the bucket-load.

As I know a certain chap who is away over there at the moment and happens to have a birthday coming up, I thought I'd give it a go myself!

I have chosen recipes from the River Cottage Cakes Book, which features lots of biscuit recipes as well.  As they have an interesting journey to make, I went for recipes which should last a good few weeks in an air-tight container.  They are all very easy and quick to make and I found versions of all the recipes online to share with you.

Hazelnut macaroons x 2 bags


I am not sure how many will actually make it out of the house.  These are divine and super quick and simple to make.  They are also the least likely to travel well as they have a little chocolate in them, but I couldn't resist!

Christmas biscuits x 3 bags


Christmassy biscuits but without the icing in lots of different shapes.  Mental note buy more cookie cutters that aren't Christmassy - shame that, having to buy more :-) 

Anzac biscuits x 2 bags


Well these are bound to last, as they were the biscuits made by New Zealand and Australian wives, to send out by boat to their partners during the Second World War.  Very hearty and oaty.

Now I've just got to figure how in heck I'm going to package them up so they arrive intact!!! 
I wonder if the recipient will share.

Happy baking.......

Monday, 20 August 2012

Mary Berry's Chocolate Whoopie Pies!

I do like a good birthday excuse to get baking!  Yesterday I was sifting through my recipes that had been torn from magazines and came across these Whoopie Pies!  Now who can resist a name like that, especially as the Birthday Boy was my buddy Lucas who's turning 7 today!

The recipe says to whisk the butter, egg, sugar and soured cream with an electric hand-held whisk, but I chose to use the K beater attachment on my trusty Kenwood.  Instead of adding them all together, I creamed the butter and sugar first, then added the cream and then the egg.

Half the flour, cocoa powder and bicarbonate of soda was sifted in and blended, before sifting in the remainder.  It all came together very nicely and was thick and smooth as suggested. 

My measuring, however, was a little slapdash!  You are meant to divide the mixture in half and then spoon 15 equal portions onto 2 lined baking trays.  Well I went for the guessing option....... Lets just say some of my Whoopies are 'Whooper Whoopies'!  I think using a quick release ice-cream scoop might be a good idea to get an even size.  I have heard people use these for cookie dough, etc.

I popped them into a pre-heated 160c fan oven for 15 minutes, switched the trays over in the oven and baked for another 4 minutes as they didn't look quite cooked.

They are supposed to be risen and firm to the touch and cracked a little in the middle!  Well mine sure are cracked!  Unique I think is a good description.

I then sandwiched them together with Nutella....... I know!!!  I altered a Mary Berry Recipe!  It was an inspired choice.  They were then topped with the icing sugar topping and adorned with chocolate sprinkles.

They were rather large, but tasted yummy, especially with the Nutella centre.  Enjoyed by adults and kids alike and really quick to make.

Now, you may have noticed the slight lack of photos!  OH has very kindly nabbed all the cameras for a kayaking trip, leaving me with an old dud camera for which I cannot find the USB lead to upload the rather terrible photos I took of my Whoopies.  Desperate measures meant me asking Lucas's Mum to take a photo of the Whoopies this morning - how sad am I!!  Hardly like the delightfully compact Mary Berry versions on the recipe link, but tasty nonetheless.


Can you guess which are mine??


Go on give them a go, even if just for the name!

Happy baking!